For my first blog post, I’d like to share how I created this blog. My stack utilizes Hugo, AWS S3, AWS CloudFront, AWS Certificate Manager, AWS Route 53, git, and GitHub actions. While this method isn’t the easiest to configure, once its complete it allows you to focus on the whole point of the blog in the first place, writing. If you want an easy method that doesn’t require much technical skill or effort check this out. However, this technical configuration and setup allows us to have more control over our blog and its security.
Now, let’s get started:
- First, lets create all the necessary accounts for this stack. We will have to make an AWS account and a GitHub account.
- While we are on GitHub, let’s create a repository where we will upload and store our code.
- On the Dashboard, select the ‘+’ drop down and select ‘New repository’. I suggest naming it ‘blog’ but feel free to name it to your liking.
- Add a description if you’d like and select ‘Private’ as this repo may contain sensitive information.
- Click ‘Create repository’.
- Next, let us install Hugo.
- After installing Hugo, choose a theme for your blog. I recommend only choosing a theme that has an ’examplesite’ section for ease of setup purposes. You can confirm if a site has an ’examplesite’ by finding the folder on the theme’s GitHub repo.
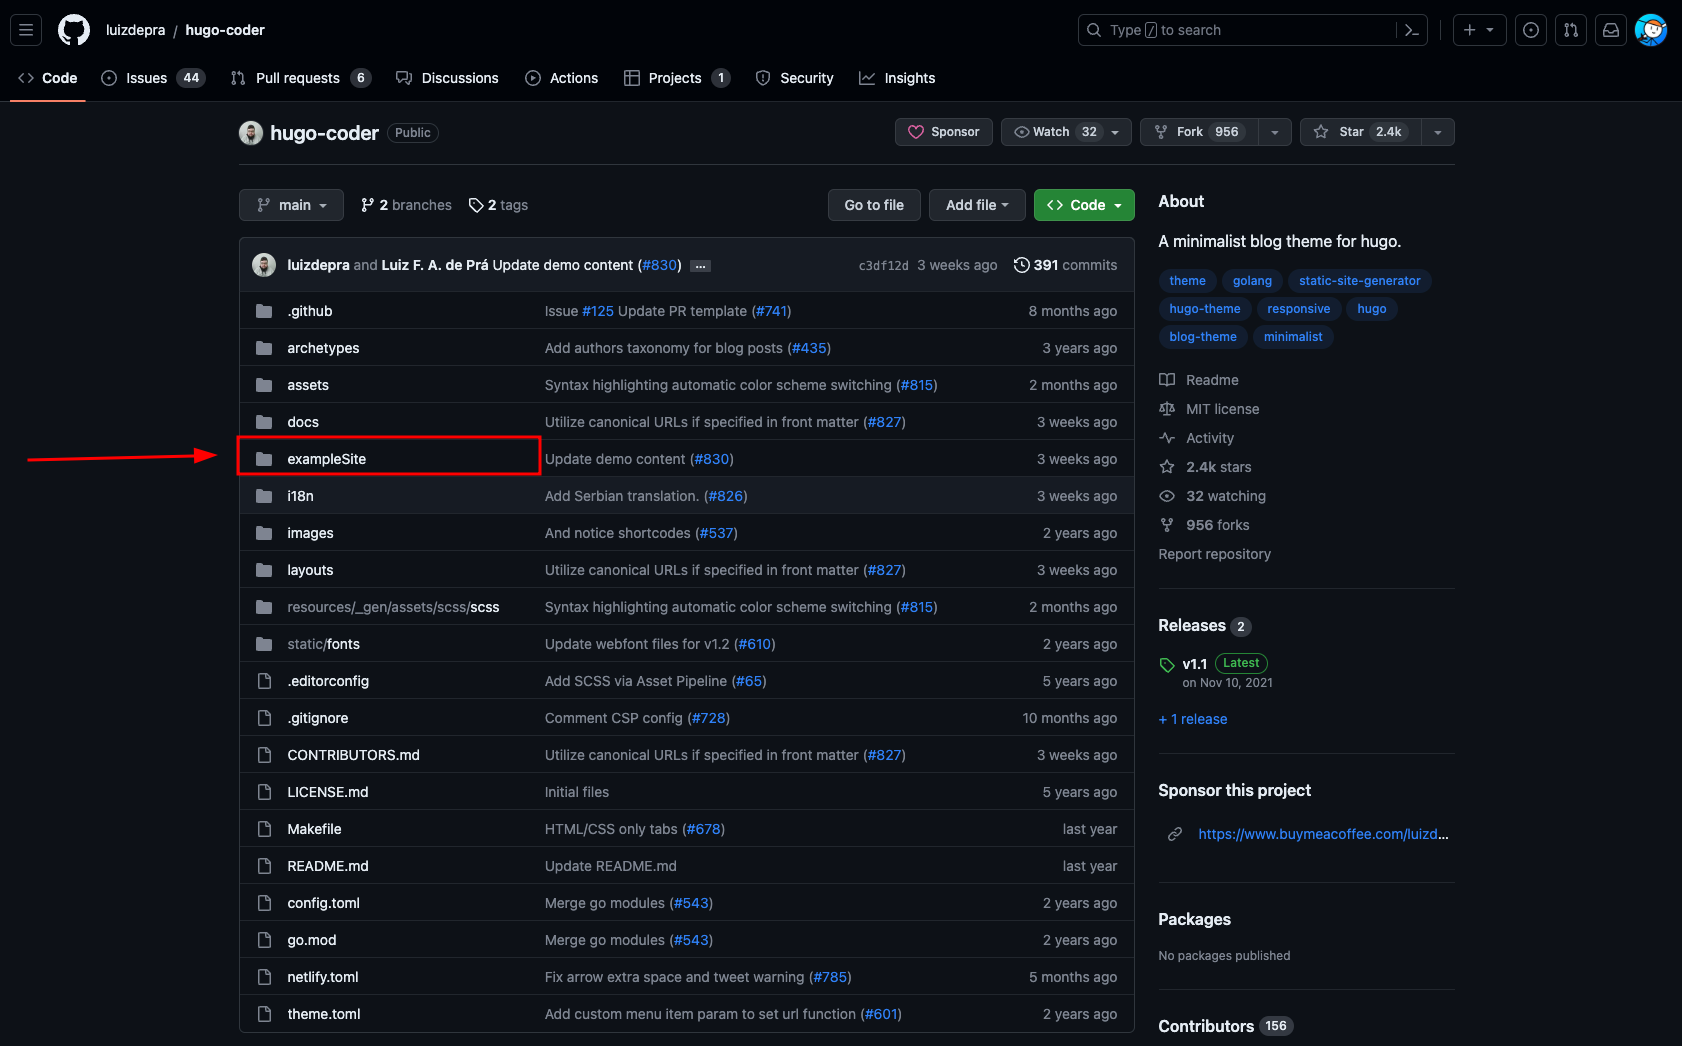
- Once you’ve chosen your theme, I recommend following the Hugo Quick Start guide then coming back to this page to continue to the next step.
- After installing Hugo, choose a theme for your blog. I recommend only choosing a theme that has an ’examplesite’ section for ease of setup purposes. You can confirm if a site has an ’examplesite’ by finding the folder on the theme’s GitHub repo.
- Let’s set ourselves to be able to push Hugo site code to GitHub
- First, create an ssh key via ssh-keygen or use an existing key you already have on your machine(make sure your remember the password as it will be required for each git push).
- Once you have a key created, navigate to GitHub and go to ‘Settings’ which can be accessed by clicking on your avatar in the upper-right. Once in ‘Settings’, select ‘SSH and GPG keys’ from the ‘Access’ section.
- Select ‘New SSH key’, give it a name, and paste your public keys value in the ‘Key’ section. Click ‘Add SSH key’.
- Let’s quickly navigate to our GitHub repo and click on the ‘Settings’ section. Navigate to the ‘Actions’ section and select ‘General’ from the dropdown menu. Once there, select ‘Read and write permissions’ under the ‘Workflow permissions’ section.
- Now, back to the terminal. Change to the root of our site directory created in the Hugo Quick Start guide.
- Run the following commands individually replacing the username and repo name with yours:
git init git remote add origin git@github.com:<username>/<repo-name> git add --all git commit -m 'Commit message' git push origin main - Now lets create a GitHub workflows directory and workflow file by running the below commands:
mkdir -p .github/workflows/ cd .github/workflows/ touch main.yml - Input the following code into your ‘main.yml’ file
name: Build and Deploy Hugo Site on: push: branches: - main jobs: deploy_blog: runs-on: ubuntu-latest steps: - name: checkout blog uses: actions/checkout@v3 with: submodules: true fetch-depth: 0 - name: Setup Hugo uses: peaceiris/actions-hugo@v2 with: hugo-version: '0.110.0' extended: true - name: Build run: hugo --minify - name: Deploy to S3 run: hugo deploy --force --invalidateCDN env: AWS_ACCESS_KEY_ID: ${{ secrets.AWS_ACCESS_KEY_ID }} AWS_SECRET_ACCESS_KEY: ${{ secrets.AWS_SECRET_ACCESS_KEY }} - Save the config file.
- We now need to create an Access Key in AWS and save the results as Secrets in our GitHub repository.
- Navigate to AWS and search for ‘IAM’, click ‘IAM’.
- Select the ‘My security credentials’ button in the ‘Quick Links’ section.
- Select ‘Create ‘access key’ in the ‘Access keys’ section.
- Click the checkbox confirming the risk and click ‘Create access key’.
- Let’s now go to our GitHub repository and click ‘Settings’.
- Click the dropdown for the ‘Secrets and variables’ section and click ‘Actions’.
- Click ‘New repository secret’, enter the Name of ‘AWS_ACCESS_KEY_ID’ and the Secret as your newly generated access key from AWS. Now, add another secret with the Name of ‘AWS_SECRET_ACCESS_KEY’ and the Secret as your newly generated secret access key from AWS.
- Now, let’s go back to our AWS account we created and create the needed S3 bucket.
- Go to your AWS console and search for s3, click s3.
- Click ‘Create Bucket’. Choose a unique bucket name - I chose to go with my domain name to make things easier(more on this later).
- Uncheck ‘Block all public access’ and confirm it since we want our static website to be publicly accessible from the Internet.
- Click ‘Create Bucket’.
- Now, we need to create an access policy to make sure our bucket is public to prevent permissions issues from occurring.
- Open the bucket you just created from the console and click ‘Properties’.
- Scroll down to the bottom and click ‘Edit’ on the ‘Static website hosting’ section.
- Select the ‘Enable’ radio button for ‘Static website hosting’ and set the ‘Index document’ to ‘index.html’.
- Click ‘Save Changes’.
- Go to the ‘Permissions’ tab in our bucket and click ‘Edit’ on the ‘Bucket policy’ section. Replace the code with the code below and replace the ’example.com’ with your bucket name.
 {
    "Version": "2012-10-17",
    "Id": "Policy1691181505860",
    "Statement": [
        {
            "Sid": "GrantPublicReadAccess",
            "Effect": "Allow",
            "Principal": "*",
            "Action": "s3:GetObject",
            "Resource": "arn:aws:s3:::example.com/*"
        }
    ]
 }
- Assuming you’ve completed the ‘Hugo Quick Start’ guide reference earlier, you should now have a ‘Public’ folder in your blog’s directory. Let’s go to s3, click on our bucket we created, and click the ‘Objects’ tab. Now, click the ‘Upload’ button and let’s upload the contents of our ‘Public’ folder.
- Now that our files have been uploaded to our bucket, let’s select the ‘index.html’ file and click the ‘Object URL’ to verify everything is displaying properly. Our bucket is now set up!
- Now, let’s configure AWS Route 53, Amazon’s DNS service.
- In your AWS Console search for ‘route 53’ and select it.
- Under ‘DNS Management’, click ‘Create hosted zone’.
- Inside the ‘Domain name’ field, input your domain name. If you don’t have one, you can purchase one directly through Route 53’s ‘Registered domains’ section. I personally use Google Domains and recommend a domain structure of firstnamelastname.com(tonyharkness.com)
- ‘Type’ will be ‘Public hosted zone’.
- Click ‘Create hosted zone’.
- If we didn’t register our domain with Route 53, we need to link our domain with the records in Route 53 by pointing the nameservers to Route 53. This will vary by registrar but for Google Domains, follow this guide.
- Now that our nameservers are pointed to Route 53, search in AWS for ‘Certificate Manager’ and click the link.
- Click ‘Get started’ under ‘Provision certificates’
- Click ‘Request a public certificate’ and then ‘Request a certificate’
- Fill in the domain name with your custom domain and then click ‘Next’.
- Choose a method of validation, I suggest sticking with the Default(DNS Validation).
- On the next screen you will see that the status is ‘Pending validation’. This can take from 24-48 hours to complete. Let’s click on the ‘Certificate ID’ and click ‘Create records in Route 53’ under the ‘Domains’ section and then click ‘Create records’. This may take up to 30 minutes for the certificate to be issued.
- Click ‘Next’ until you can ‘Confirm and request’ the certificate.
- In the AWS Console, search for ‘CloudFront’ and click the link.
- Click ‘Create Distribution’. On the next page, you should see an ‘Origin domain’ section, select your s3 bucket. Once selecting your bucket, a warning should display referencing ‘This S3 bucket has static web hosting enabled’. Select the button within the warning that says ‘Use website endpoint’
- Scroll down and set the ‘Viewer protocol policy’ to ‘Redirect HTTP to HTTPS’.
- Scroll further and click the ‘Add item’ button under the ‘Alternate domain name(CNAME)’ section, add both your root domain and subdomain. Example: example.com, (www).example.com
- Select ‘Custom SSL certificate’ and choose the certificate we created in the previous step
- Finally, click ‘Create distribution’.
- Now, let’s go back to Route 53 and add the additional records needed for DNS to work properly with our custom domain.
- Once in Route 53 and in our previously created Hosted zone, click ‘Create Record’. Toggle the ‘Alias’ button to on, and select the ‘Alias to CloudFront distribution’ from the ‘Route traffic to’ option. Select the created CloudFront distribution.
- Click ‘Add another record’ but this time set the ‘Record name’ to ‘www’ to include your subdomain. Then, toggle the ‘Alias’ button to on, and select the ‘Alias to another record in this hosted zone’. Select our record we just created(which should be your root domain e.g. example.com) and click ‘Create records’.
- Our AWS setup is complete. Let’s now update our Hugo config file(mine is named ‘config.toml’)
- Open the config file with an editor of your choice and paste the below code in:
[deployment] [[deployment.targets]] name = "example.com" URL = "s3://example.com?region=us-east-1" cloudFrontDistributionID = "here" [[deployment.matchers]] # Cache static assets for 20 years. pattern = "^.+\\.(js|css|png|jpg|gif|svg|ttf)$" cacheControl = "max-age=630720000, no-transform, public" gzip = true [[deployment.matchers]] pattern = "^.+\\.(html|xml|json)$" gzip = true- Replace the name with your domain name, the ’example.com’ section with your bucket name and the cloudFrontDistributionID with the DistributionID of the previously created Distribution. You can find this in CloudFront>Distributions>ID.
- Now, save the config file.
- Great job! If you made it this far, well done. We will lastly look at the workflow you will perform when wanting to deploy content to your site.
- First, cd into the base of your blog directory.
- Now, every time you make changes and want to upload your site, run the following code:
git add .
git commit -m 'Commit Message'
git push origin main
You’re all done! I hope you found this guide helpful and your site is now up and running. If you have any questions or would like to connect, please connect with me.